With the dawn of October and a new month its time I swap from "Lenne's and Shuyin's Story" to "The Final Chapters". If you haven't figured it out yet "The Final Chapters" is the follow up from Final Fantasy X-2 International + Last Mission. This concentrates on Yuna's and Tidus' story together along with their friends and companions.
So what's expected to come out of this month or so working on "The Final Chapters"? I've decided to alter the use of Lenne as a active party member when available. Originally Lenne could summon only in "Lenne's and Shuyin's Story" but now I've decided that the summoning of an aeon can play a optional role in the later parts of "The Final Chapters" in battles should the player wish to use an aeon to take place of the active party in battles. The initial reasons for not having summons on "The Final Chapters" is because Yuna has forgotten how to summon and the sending for that matter. I wanted Yuna to remain the more upbeat Yuna as in Final Fantasy X-2 where summoning and teachings of Yevon have been disbanded. If I were to have Yuna able to perform the sending and summon aeons not only would it mean having to change significant parts of the already existing plot but it would also mean having to explain why Yuna can summon on X-3 but not on X-2. Other reasons are that summoning might bring back bad memories for Yuna such as the sacrificing of her aeons in order to defeat Sin forever. And I intend to keep the Fayth as the main antagonists.
So to incorporate a change for Lenne's commands I've decided that only one aeon is available to summon. This aeon is Anima. The reason being is that Anima's Fayth (Seymour's mother) is the only remaining Fayth to have survived who rejected the beliefs of the other Fayth such as Ixion, Valefor, Ifrit and Bahamut. Anima's Fayth believes the other Fayth's ideas are wrong and would provide her power to help defeat the Fayth. This means siding the protagonists by appearing as an aeon for Lenne to summon. However I intend to make this only an optional task for the player to complete should the player need to. Initially I would only have Anima obtainable until after Raphas has been defeated, during chapter five (5) and depending upon if mission "Farplane break" in chapter three (3), Lenne and Shuyin defeat Baralai and Gippal in Chapter four (4) and if Lenne and Shuyin defeat Dark Anima in Baaj temple in chapter five (5).
Having Anima on the allies side is only optional but it will provide another asset in battle situations and will help in difficault battle situations. Completing this scene will also increase the completed score. So if the player is to obtain Anima this will make Lenne a valuable asset in battles when available as she is the only playable character able to summon. To fair things up however Lenne loses the command Use in both "The Final Chapters" and "Lenne's and Shuyin's Story". Initially both Lenne and Shuyin were to have the command Use in both "The Last Chapters" and "Lenne's and Shuyin's Story" but now only Shuyin will be able to use the command Use (besides Rikku in "The Final Chapters"). This is to balance the use of the playable characters thoughout instead of allowing the potential player to utilise only three (3) or less playable characters which would ruin the element of strategy.

Embark on the final chapters of their story… Sin has gone; Vegnagun destroyed, the Eternal Calm is here. They thought their peaceful days together would never end. But a sinister attack on their home throws Yuna, Tidus and their friends in a fight to save Spira once more. There they’ll discover the truth…
Thursday, 1 October 2009

Wednesday, 30 September 2009
Summoning aeons (Lenne only)
Summoning returns in Final Fantasy X-3 in both "The Final Chapters" and "Lenne's and Shuyin's Story". But the range of aeons to summon is limited and only one party member can use the Summon command. Only Lenne can summon aeons to take the party's place in battles.
Once the player takes command of Lenne in battles an additional command will be available alonside with Attack, Sing, Dance, Hidden Suprise, Fake It and Item. Lenne has the ability to call upon aeons during battles. In essence this works the same way as summoning for Yuna in FFX (Final Fantasy X). Each aeon when summoned will take contol of the battle on the party's behalf. with their own abilities, attributes and Overdrives. The summoned aeon will fight alone however the active party members will be automatically thrown back into the fray by selection of Dismiss (calls the aeon back) or the aeons HP reaches zero (0) or Banish is used in either case the aeon will then disappear. But unlike in FFX the only way an aeon's attributes can improve or for an aeon to learn new abilities is in tandem with Lenne's levelling. Each aeon will have abilities pre-learnt while new abilities will become available when enough AP is earned in battle.
In "The Final Chapters" Lenne can only summon Anima if:
Obtaining Anima is optional but with the enabbled Summon command Anima can be brought into battle whenever Lenne is part of the active party. Anima is very powerful yet slow aeon. In exchange for Agility, Evasion and Magic Anima is overpowering in attack and Pain is simply devastating to even those who are immune to Death. However becuase of its menace it cannot evade any attacks. When Lenne levels up Anima's HP, Strength and Intimidation will benefit the most in tandem to Lenne's attributes improving via levelling up.

In "Lenne's and Shuyin's Story" Lenne can summon either Valefor or Ixion as of when Lenne is sent to the frontlines. After the battle with Yu Yevon within Sin the Summon command will be disabled until Lenne can obtain Bahamut in Bevelle. Shiva can be obtained in Macalania temple though it is only optional.
Valefor is an aeon that flies which gives it great Evasion. Added to this Valefor's Agility allows quick and efficent commands. Sonic Wings damages all opponents and may subsequently delay their attacks. However its main strength lies in the use of Magic. Magic and Evasion will improve in tandem with Lenne's levelling up.


Ixion mixes Defence and Agility. In particular it is effective using Lightning elemental attacks and Magic such as Thunder. Ixion is the ideal aeon to summon when facing machina. Aerospark is a handly command with inflicts non-elemental damage upon an opponent and nulifies Shell, Protect, Haste, Regen and Reflect. Thor's Hammer is Ixion's Overdrive which will inflict significant Lightning damage to all opponents. In tandem with Lenne's levelling up Ixion's Defence, Magic Defence and Agility will improve the most.


Shiva, the Ice Queen attacks swiftly relying upon Ice elemental commands such as Blizzaga. Like Ixion, Shva has a preferred battling style using a specific element which is Ice. This makes her strong and efficent using Ice elemental Magic and commands but weak against Fire element. Heavenly Strike inflicts non-elemental damage to an opponent which may cause the opponent to flinch. Shiva's Overdrive, Diamond Dust can shatter her opponents upon the snap of her fingers. Evasion and Agility will increase the most in tandem with Lenne's levelling up.


Bahamut is arguably the best all rounder out of the aeons available mixing very strong attacks, Defence and Magic Defence and Magic. Impulse will inflict damage on all opponents however Bahamut will need to recharge leaving it open to attacks in the process. This is the major drawback as Bahamut requires time to recharge after using Impulse or Mega Flare which will almost literally wipe the floor with its opponents requires build up which too leaves the aeon vulnerable. Its Agility to build up for the next command is slugglish and although Bahamut sprouts wings this doesn't give it great Evasion. Bahamut's strength rests in its offensiveness both physical and Magic. All of Bahamut's attributes will increase equally in tandem with Lenne's levelling up.


Once the player takes command of Lenne in battles an additional command will be available alonside with Attack, Sing, Dance, Hidden Suprise, Fake It and Item. Lenne has the ability to call upon aeons during battles. In essence this works the same way as summoning for Yuna in FFX (Final Fantasy X). Each aeon when summoned will take contol of the battle on the party's behalf. with their own abilities, attributes and Overdrives. The summoned aeon will fight alone however the active party members will be automatically thrown back into the fray by selection of Dismiss (calls the aeon back) or the aeons HP reaches zero (0) or Banish is used in either case the aeon will then disappear. But unlike in FFX the only way an aeon's attributes can improve or for an aeon to learn new abilities is in tandem with Lenne's levelling. Each aeon will have abilities pre-learnt while new abilities will become available when enough AP is earned in battle.
In "The Final Chapters" Lenne can only summon Anima if:
- Mission "Farplane break" during chapter four (4) is successful
- Lenne and Shuyin defeat Baralai and Gippal during chapter five (5)
- Lenne and Shuyin defeat Dark Anima during chapter five (5)
Obtaining Anima is optional but with the enabbled Summon command Anima can be brought into battle whenever Lenne is part of the active party. Anima is very powerful yet slow aeon. In exchange for Agility, Evasion and Magic Anima is overpowering in attack and Pain is simply devastating to even those who are immune to Death. However becuase of its menace it cannot evade any attacks. When Lenne levels up Anima's HP, Strength and Intimidation will benefit the most in tandem to Lenne's attributes improving via levelling up.

In "Lenne's and Shuyin's Story" Lenne can summon either Valefor or Ixion as of when Lenne is sent to the frontlines. After the battle with Yu Yevon within Sin the Summon command will be disabled until Lenne can obtain Bahamut in Bevelle. Shiva can be obtained in Macalania temple though it is only optional.
Valefor is an aeon that flies which gives it great Evasion. Added to this Valefor's Agility allows quick and efficent commands. Sonic Wings damages all opponents and may subsequently delay their attacks. However its main strength lies in the use of Magic. Magic and Evasion will improve in tandem with Lenne's levelling up.


Ixion mixes Defence and Agility. In particular it is effective using Lightning elemental attacks and Magic such as Thunder. Ixion is the ideal aeon to summon when facing machina. Aerospark is a handly command with inflicts non-elemental damage upon an opponent and nulifies Shell, Protect, Haste, Regen and Reflect. Thor's Hammer is Ixion's Overdrive which will inflict significant Lightning damage to all opponents. In tandem with Lenne's levelling up Ixion's Defence, Magic Defence and Agility will improve the most.


Shiva, the Ice Queen attacks swiftly relying upon Ice elemental commands such as Blizzaga. Like Ixion, Shva has a preferred battling style using a specific element which is Ice. This makes her strong and efficent using Ice elemental Magic and commands but weak against Fire element. Heavenly Strike inflicts non-elemental damage to an opponent which may cause the opponent to flinch. Shiva's Overdrive, Diamond Dust can shatter her opponents upon the snap of her fingers. Evasion and Agility will increase the most in tandem with Lenne's levelling up.


Bahamut is arguably the best all rounder out of the aeons available mixing very strong attacks, Defence and Magic Defence and Magic. Impulse will inflict damage on all opponents however Bahamut will need to recharge leaving it open to attacks in the process. This is the major drawback as Bahamut requires time to recharge after using Impulse or Mega Flare which will almost literally wipe the floor with its opponents requires build up which too leaves the aeon vulnerable. Its Agility to build up for the next command is slugglish and although Bahamut sprouts wings this doesn't give it great Evasion. Bahamut's strength rests in its offensiveness both physical and Magic. All of Bahamut's attributes will increase equally in tandem with Lenne's levelling up.


Wednesday, 23 September 2009
Features for "Lenne's & Shuyin's Story"
To play the additional story “Lenne’s and Shuyin’s Story” the following criteria must be met in the, “The Final Chapters” story (main story).
Levelling up
- Mission "Farplane break" successful (chapter three (3))
- Lenne and Shuyin defeat Baralai and Gippal (chapter four (4)
- Better ending/epilogue obtained at least
If these criteria have been met successfully then “Lenne’s and Shuyin’s Story” will become available (and unavailable if not all of the given criteria are met). Selecting “Lenne’s and Shuyin’s Story” will take the player controlling Yuna and Tidus on
“Lenne’s and Shuyin’s Story” is not a mini game or extended battle. It is a story in similar proportion as the main story “The Final Chapters”. Of which it is essential to play it in the same perspective and read the contents before diving into the story.
At some points in the, “The Final Chapters” game the player will gain control of both Lenne and Shuyin. Like situations where only Yuna and Tidus are playable in battle Lenne and Shuyin work in the same way. Abilities and attributes for Lenne will be the same as Yuna’s (when Songstress). The same can be said for Shuyin as he’ll be based upon the same abilities, Overdrives and attributes as Tidus. Likewise to Lenne names of some abilities will be different.
However…there are differences:
Neither Lenne nor Shuyin can Sphere change
Special Overdrive only occurs when both are active
Shuyin cannot use the Copycat command
In Shuyin’s case abilities that Tidus learns such as Yawn and Cheer are not available
Lenne has the additional command: “Summon” which allows her to select an aeon to take place in battles
Lenne has the command “Attack”
Shuyin has the command “Use”
Some abilities are already pre-learnt (see “Extras” column for abilities listing)
There is no Sphere Grid for Lenne and Shuyin. Attributes such as Strength and HP improve automatically by levelling up
Levelling up
AP is used for improving attributes. After victory in battle the characters used in that battle will gain AP and eventually with enough AP characters will level up. The higher the characters’ level the more AP is required to level up. In the status window (press triangle to access) CSD is displayed for every character active in the party. Increase in a character’s attributes for each time Lenne or Shuyin levels up depends upon their preferred fighting styles. With each level up all ten (10) attributes are increased but the amounts vary.
Levelling up attributes for Lenne
Strength +2 Accuracy +2
Defence +1 Agility +3
Evasion +2 Luck +3
Magic +2 Stamina +2
Magic Defence +4 Intimidation +1
Levelling up attributes for Shuyin
Strength +4 Accuracy +2
Defence +3 Agility +2
Evasion +3 Luck +1
Magic +1 Stamina +2
Magic Defence +1 Intimidation +2
Time Paradox
If the party is KO’d or unable to remain active in battle or in specific events it will result in game over. However if any circumstance meets game over this will result in a time paradox. This is because “Lenne’s and Shuyin’s Story” happens a 1000 years before Final Fantasy X, X-2 and X-3. Not to mention this won’t be according to the end (which if you’ve played Final Fantasy X-2 enough will know that Lenne and Shuyin die in Bevelle after he tries to use Vegnagun). Like when game over occurs there is no continue option, the player has to restart from the point where the game was last saved by using a Save Sphere.
Tuesday, 22 September 2009
Lenne's & Shuyin's Story - update
Like with the "The Final Chapters" I have completed the base of the story and contents for "Lenne's & Shuyin's Story". From here on there will be additions, changes and futher documentation made before I am happy enough to publish my work.
P.S: Sorry its been a while since my last post. I'll try to put more posts up soon.
P.S: Sorry its been a while since my last post. I'll try to put more posts up soon.
Saturday, 29 August 2009
Minigames - Blitzing
A newly discovered past time from 1000 years ago
Rules
Ø Each competing player has three (3) Blitzballs. Therefore each player has three (3) turns.
Ø The aim of winning this game is to obtain the furthest distance with a Blitzball thrown. The winning distance isn’t the sum of more then one (1) Blitzball thrown.
Ø The pitch is measured in meters and its range starts from zero (0) to 500. The pitch is limited not by distance but by width. The legal throwing range is restricted by the setup of the pitch.
Pitch

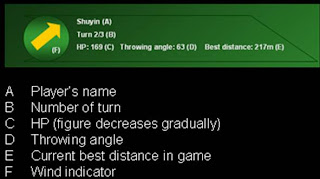
As mentioned in a player’s statistic/status window the throwing angle is displayed before the throw is made. When it’s a player’s turn and the player decides to throw a Blitzball the throw is determined by a number of elements; HP, throwing angle, wind and skill level.
HP
The player’s figure for HP determines how strong the throw or command will be. Say for example a player’s HP is 169 but it decreases by one (1) every second. The more HP a character has determined before the given command is taken (in other words before the player presses X on the throwing angle indicator (or selection depending what action is taken upon the player’s turn)) the stronger the output. The lower the HP the weaker the output becomes. Do for a strong action a high HP is required. However there are situations where a weaker HP (particularly when throwing) is more effective. If the wind for example is indicated north and the strength of the wind is strong (this is indicated by the wind indicator turning red) it means the Blitzball will be carried northwards by the wind. If the player throws the Blitzball in this type of wind with a high HP its likely the throw will fly beyond the 500m mark and result in disqualification. A weaker throw made my less HP will more likely not result in disqualification.
Skill level
In the same way the more a player plays BlitzBall and BaseBlitz the more AP is gained resulting to levelling up. Levelling up brings improvements in a player’s stats such as HP and gain newer abilities. A player’s stats will be same throughout BlitzBall, BaseBlitz and Blitzing.
Throwing angle
The throwing angle is the last necessary input for a player to make before throwing. The throwing angle is determined by the player’s action to stop on the angle indicator.
Rules
Ø Each competing player has three (3) Blitzballs. Therefore each player has three (3) turns.
Ø The aim of winning this game is to obtain the furthest distance with a Blitzball thrown. The winning distance isn’t the sum of more then one (1) Blitzball thrown.
Ø The pitch is measured in meters and its range starts from zero (0) to 500. The pitch is limited not by distance but by width. The legal throwing range is restricted by the setup of the pitch.
Pitch

The diagram shown above is an example of a Blitzing pitch. The layout of the pitch can vary but principally the setup is the same. Each pitch has what’s called a “Throwing zone” and a legal throwing area. In order for a player to obtain a distance the player is required to throw a Blitzball the furthest possible whilst staying in the legal throwing area. Any Blitzball thrown that crosses the side lines that mark between the legal throwing area and the illegal area is disqualified.
Elements
In Blitzing there are a number of different elements that can affect the player’s throw. Like in BlitzBall and BlitzBase each competitor has statistics and attributes such as HP. A player’s statistic/status window may show:
In Blitzing there are a number of different elements that can affect the player’s throw. Like in BlitzBall and BlitzBase each competitor has statistics and attributes such as HP. A player’s statistic/status window may show:

As mentioned in a player’s statistic/status window the throwing angle is displayed before the throw is made. When it’s a player’s turn and the player decides to throw a Blitzball the throw is determined by a number of elements; HP, throwing angle, wind and skill level.
HP
The player’s figure for HP determines how strong the throw or command will be. Say for example a player’s HP is 169 but it decreases by one (1) every second. The more HP a character has determined before the given command is taken (in other words before the player presses X on the throwing angle indicator (or selection depending what action is taken upon the player’s turn)) the stronger the output. The lower the HP the weaker the output becomes. Do for a strong action a high HP is required. However there are situations where a weaker HP (particularly when throwing) is more effective. If the wind for example is indicated north and the strength of the wind is strong (this is indicated by the wind indicator turning red) it means the Blitzball will be carried northwards by the wind. If the player throws the Blitzball in this type of wind with a high HP its likely the throw will fly beyond the 500m mark and result in disqualification. A weaker throw made my less HP will more likely not result in disqualification.
Skill level
In the same way the more a player plays BlitzBall and BaseBlitz the more AP is gained resulting to levelling up. Levelling up brings improvements in a player’s stats such as HP and gain newer abilities. A player’s stats will be same throughout BlitzBall, BaseBlitz and Blitzing.
Throwing angle
The throwing angle is the last necessary input for a player to make before throwing. The throwing angle is determined by the player’s action to stop on the angle indicator.

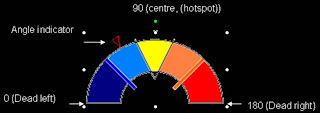
The throwing angle is determined by the player’s stop of the angle indicator. The angle indicator moves from left to right and then back continuously until the player prompts the indicator to stop by pressing X, The throwing angle works on the principals of a 180 protractor; the left side starting at zero (0) and the right ending at 180. The centre or hotspot is indicated in yellow at the 80 to 100 degree angle. To make the best of any attempted throw the player has to set the throwing angle to work best with the predetermined wind angle and strength. For example against calmer wind the player throwing would be better off stopping the angle indicator at the hotspot area marked in yellow. But in other example situations when the wind is strong and blowing to the left the player would aim for a throwing angle aimed more to the right side or higher angles to counteract the wind.
Wind
The natural phenomenon in Blitzing which can turn the game around as easily as the wind changes direction. Its therefore important for any player going for the win to have the wind in their favour when throwing the Blitzball. To do this the wind’s direction and strength is indicated on the active player’s statistic/status window. During the course of a game the direction of the wind and its intensity to affect a thrown Blitzball varies after each turn.
Ø The wind direction follows a compass navigation and can be indicated at north, north-east, east, south-east, south, south-west, west and north-west
Ø The intensity of the wind is defined by the colour of the wind indicator on the player’s statistic/status window
Ø If the indicator is blue it means the wind is almost harmless to a thrown Blitzball
Ø If the indicator is yellow it means the wind can throw a Blitzball slightly off course depending upon the wind’s direction
Ø If the indicator is red it means the wind can throw a Blitzball significantly off course

Wind
The natural phenomenon in Blitzing which can turn the game around as easily as the wind changes direction. Its therefore important for any player going for the win to have the wind in their favour when throwing the Blitzball. To do this the wind’s direction and strength is indicated on the active player’s statistic/status window. During the course of a game the direction of the wind and its intensity to affect a thrown Blitzball varies after each turn.
Ø The wind direction follows a compass navigation and can be indicated at north, north-east, east, south-east, south, south-west, west and north-west
Ø The intensity of the wind is defined by the colour of the wind indicator on the player’s statistic/status window
Ø If the indicator is blue it means the wind is almost harmless to a thrown Blitzball
Ø If the indicator is yellow it means the wind can throw a Blitzball slightly off course depending upon the wind’s direction
Ø If the indicator is red it means the wind can throw a Blitzball significantly off course

Commands
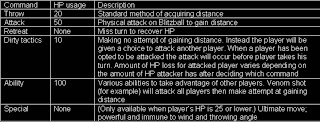
When it’s a player’s turn a decision must be made before their HP is used up. The player has to be quick to make his/hers cause of action (COA) but his/hers options aren’t limited to throwing.
When it’s a player’s turn a decision must be made before their HP is used up. The player has to be quick to make his/hers cause of action (COA) but his/hers options aren’t limited to throwing.

Whatever command is chosen each player must make three (3) command decisions.
Monday, 17 August 2009
Sphere changing (continued) - Rikku’s Mixing It Up
 As well as using Mix to unleash seemingly endless affects during battle Rikku specialty Mixing It Up allows her to do much more. With sufficient Dresspheres Rikku can set herself her own Garment Grid which can be a mixture of the same or different Dresspheres for battle. So at one moment during battle she could be wearing the Thief Dressphere (default Dressphere for Rikku) and utilising Flimflam and the next she can be in the Berserker Dressphere and ripping through her opponents using Instinct commands. However this setup is not the same as in Final Fantasy X-2 where a character (providing it’s her turn) can willingly Sphere change into whichever Dressphere available on the Garment Grid. This incorporates the “Dress Up” command seen in “Last Mission” on Final Fantasy X-2 International + Last Mission.
Only Rikku has this option to change, manage Dresspheres (and can have her Dresspheres destroyed) and unlike in “Last Mission” there is no option to change Dressphere during battle. The only way to access this option is in the Mixing It Up sub menu available when Rikku is selected from the option Status. Although you don’t have to set up a combination of Dresspheres it is well advised to do so to maximise Rikku’s efficiency in battle for each Dressphere as its set amount of HP which makes a part of Rikku’s HP and if the HP for the current Dressphere worn reaches zero (0) the Dressphere will break.
If there is another Dressphere set in line Rikku will Sphere Change into the next Dressphere however if there are no more Dresspheres after the initial Dressphere is destroyed Rikku will enter the Bare state which reduces Rikku to commands Attack and Item. Strength, Defence, Magic Defence and Intimidation are at their lowest whilst in the Bare state. With the use of different Dresspheres Rikku can utilise many different commands depending upon the current Dressphere.
When Rikku is using one of the Dresspheres her commands will change. For example whilst in Thief Dressphere the command Flimflam will be available but when using a different Dressphere the command won’t become available and will be replaced with a different command (just like when one of the character’s in Final Fantasy X-2 switches from one Dressphere to another).
At the start and earlier stages of Final Fantasy X-3 this option Mixing It Up won’t be of much use because the player may not have enough Dresspheres to mix. But like obtaining items and Gil Dresspheres for Rikku can be obtained in the same way and like in Final Fantasy X-2 the player may end up with a number of the same Dresspheres.
There is nothing to say you can’t make a mix of the same Dressphere so it’s possible to have a mix of Thief Dresspheres. However whereas Rikku can use all the Dresspheres in the game like Songstress and Dark Knight there are differences and limitations when compared to the default Gunner Dressphere for Yuna. Affects of the same abilities won’t be the same and some Abilities will not be available for Rikku.
When the Garment Grid of Dresspheres has been arranged Rikku will utilise the First Dressphere on the list. For example if Thief Dressphere is first (1st) on the list then Rikku will appear in Thief Dressphere during battle. If Mascot Dressphere is second (2nd) on the list then Rikku will Sphere change into Mascot Dressphere when the Thief Dressphere has been destroyed. If Dark Knight Dressphere is third (3rd) then Rikku will Sphere change into that Dressphere when Mascot Dressphere has been destroyed. This goes on and so forth until all of the Dresspheres assigned have been destroyed of which Rikku will enter her Bare state.
Each Dressphere meets its destruction or zero (0) HP when Rikku loses a certain fraction of her overall HP. Rikku’s HP and MP is made up of the Dresspheres assigned. If three (3) Dresspheres have been assigned and Rikku’s HP results in 2,000 HP then each Dressphere will be destroyed when 500 HP is lost. Say for example Rikku starts off with Thief Dressphere, when her HP is equal to 1,500 (loss of 500 HP) that Dressphere is destroyed and Rikku Sphere changes into the next Dressphere. When a further 500 HP is lost the second (2nd) Dressphere is destroyed and Rikku Sphere changes into her last remaining Dressphere. When her HP reaches 500 HP the third (3rd) Dressphere is destroyed and Rikku will be left in her Bare state. Regardless of the Dresspheres assigned and the amount of HP Rikku has each Dressphere will follow the example explained above.
Unlike in “Last Mission” on Final Fantasy X-2 International + Last Mission the mix of Dresspheres are not shown during battle. The only evidence of a Sphere change occurring is when the Sphere change takes place which will freeze the battle temporarily. The change in Rikku’s appearance, commands and comment from Rikku will also illustrate the effects of a Dressphere being destroyed.
Sphere changing (continued)
 Tidus can only perform a Sphere change when the Moogle Mascot Dressphere is available (see Secrets section). If the Dressphere is available the same hint will appear as it does for Yuna for the player to press R1 to open the Garment Grid for Tidus. In this chase Tidus can change from Warrior Dressphere to Moogle Mascot Dressphere or Moogle Mascot Dressphere to Warrior Dressphere. If a Sphere change is prompted by the player the action during battle will stop until the Sphere change is complete. However like with Yuna; Sphere changing takes up his turn and has to wait until the next opportunity
Subscribe to:
Posts (Atom)