Important

This blog setup is not official with Square Enix or in any way connected. This project is about how Final Fantasy X-3 can be from my (Lee A. Funnell) perspective. The plot and ideas are mine. Anything that this project contains is not aimed to offend or insult non fictional related. This is a fictional story but an apology in advance anyway. This is just my explanation for my project at hand and for those who wish to learn more.

Saturday, 29 August 2009

Minigames - Blitzing

A newly discovered past time from 1000 years ago

Rules

Ø Each competing player has three (3) Blitzballs. Therefore each player has three (3) turns.
Ø The aim of winning this game is to obtain the furthest distance with a Blitzball thrown. The winning distance isn’t the sum of more then one (1) Blitzball thrown.
Ø The pitch is measured in meters and its range starts from zero (0) to 500. The pitch is limited not by distance but by width. The legal throwing range is restricted by the setup of the pitch.

Pitch


The diagram shown above is an example of a Blitzing pitch. The layout of the pitch can vary but principally the setup is the same. Each pitch has what’s called a “Throwing zone” and a legal throwing area. In order for a player to obtain a distance the player is required to throw a Blitzball the furthest possible whilst staying in the legal throwing area. Any Blitzball thrown that crosses the side lines that mark between the legal throwing area and the illegal area is disqualified.

Elements

In Blitzing there are a number of different elements that can affect the player’s throw. Like in BlitzBall and BlitzBase each competitor has statistics and attributes such as HP. A player’s statistic/status window may show:
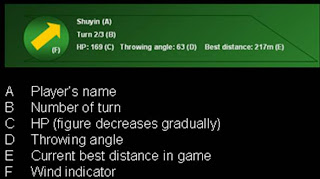


As mentioned in a player’s statistic/status window the throwing angle is displayed before the throw is made. When it’s a player’s turn and the player decides to throw a Blitzball the throw is determined by a number of elements; HP, throwing angle, wind and skill level.

HP

The player’s figure for HP determines how strong the throw or command will be. Say for example a player’s HP is 169 but it decreases by one (1) every second. The more HP a character has determined before the given command is taken (in other words before the player presses X on the throwing angle indicator (or selection depending what action is taken upon the player’s turn)) the stronger the output. The lower the HP the weaker the output becomes. Do for a strong action a high HP is required. However there are situations where a weaker HP (particularly when throwing) is more effective. If the wind for example is indicated north and the strength of the wind is strong (this is indicated by the wind indicator turning red) it means the Blitzball will be carried northwards by the wind. If the player throws the Blitzball in this type of wind with a high HP its likely the throw will fly beyond the 500m mark and result in disqualification. A weaker throw made my less HP will more likely not result in disqualification.

Skill level

In the same way the more a player plays BlitzBall and BaseBlitz the more AP is gained resulting to levelling up. Levelling up brings improvements in a player’s stats such as HP and gain newer abilities. A player’s stats will be same throughout BlitzBall, BaseBlitz and Blitzing.

Throwing angle

The throwing angle is the last necessary input for a player to make before throwing. The throwing angle is determined by the player’s action to stop on the angle indicator.
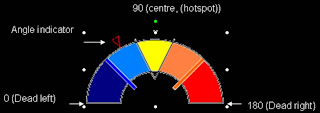


The throwing angle is determined by the player’s stop of the angle indicator. The angle indicator moves from left to right and then back continuously until the player prompts the indicator to stop by pressing X, The throwing angle works on the principals of a 180 protractor; the left side starting at zero (0) and the right ending at 180. The centre or hotspot is indicated in yellow at the 80 to 100 degree angle. To make the best of any attempted throw the player has to set the throwing angle to work best with the predetermined wind angle and strength. For example against calmer wind the player throwing would be better off stopping the angle indicator at the hotspot area marked in yellow. But in other example situations when the wind is strong and blowing to the left the player would aim for a throwing angle aimed more to the right side or higher angles to counteract the wind.

Wind

The natural phenomenon in Blitzing which can turn the game around as easily as the wind changes direction. Its therefore important for any player going for the win to have the wind in their favour when throwing the Blitzball. To do this the wind’s direction and strength is indicated on the active player’s statistic/status window. During the course of a game the direction of the wind and its intensity to affect a thrown Blitzball varies after each turn.

Ø The wind direction follows a compass navigation and can be indicated at north, north-east, east, south-east, south, south-west, west and north-west
Ø The intensity of the wind is defined by the colour of the wind indicator on the player’s statistic/status window
Ø If the indicator is blue it means the wind is almost harmless to a thrown Blitzball
Ø If the indicator is yellow it means the wind can throw a Blitzball slightly off course depending upon the wind’s direction
Ø If the indicator is red it means the wind can throw a Blitzball significantly off course


Commands

When it’s a player’s turn a decision must be made before their HP is used up. The player has to be quick to make his/hers cause of action (COA) but his/hers options aren’t limited to throwing.
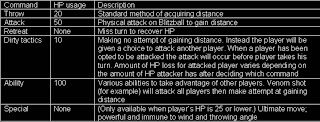

Whatever command is chosen each player must make three (3) command decisions.

Monday, 17 August 2009

Sphere changing (continued) - Rikku’s Mixing It Up

As well as using Mix to unleash seemingly endless affects during battle Rikku specialty Mixing It Up allows her to do much more. With sufficient Dresspheres Rikku can set herself her own Garment Grid which can be a mixture of the same or different Dresspheres for battle. So at one moment during battle she could be wearing the Thief Dressphere (default Dressphere for Rikku) and utilising Flimflam and the next she can be in the Berserker Dressphere and ripping through her opponents using Instinct commands. However this setup is not the same as in Final Fantasy X-2 where a character (providing it’s her turn) can willingly Sphere change into whichever Dressphere available on the Garment Grid. This incorporates the “Dress Up” command seen in “Last Mission” on Final Fantasy X-2 International + Last Mission.

Only Rikku has this option to change, manage Dresspheres (and can have her Dresspheres destroyed) and unlike in “Last Mission” there is no option to change Dressphere during battle. The only way to access this option is in the Mixing It Up sub menu available when Rikku is selected from the option Status. Although you don’t have to set up a combination of Dresspheres it is well advised to do so to maximise Rikku’s efficiency in battle for each Dressphere as its set amount of HP which makes a part of Rikku’s HP and if the HP for the current Dressphere worn reaches zero (0) the Dressphere will break.

If there is another Dressphere set in line Rikku will Sphere Change into the next Dressphere however if there are no more Dresspheres after the initial Dressphere is destroyed Rikku will enter the Bare state which reduces Rikku to commands Attack and Item. Strength, Defence, Magic Defence and Intimidation are at their lowest whilst in the Bare state. With the use of different Dresspheres Rikku can utilise many different commands depending upon the current Dressphere.

When Rikku is using one of the Dresspheres her commands will change. For example whilst in Thief Dressphere the command Flimflam will be available but when using a different Dressphere the command won’t become available and will be replaced with a different command (just like when one of the character’s in Final Fantasy X-2 switches from one Dressphere to another).

At the start and earlier stages of Final Fantasy X-3 this option Mixing It Up won’t be of much use because the player may not have enough Dresspheres to mix. But like obtaining items and Gil Dresspheres for Rikku can be obtained in the same way and like in Final Fantasy X-2 the player may end up with a number of the same Dresspheres.

There is nothing to say you can’t make a mix of the same Dressphere so it’s possible to have a mix of Thief Dresspheres. However whereas Rikku can use all the Dresspheres in the game like Songstress and Dark Knight there are differences and limitations when compared to the default Gunner Dressphere for Yuna. Affects of the same abilities won’t be the same and some Abilities will not be available for Rikku.

When the Garment Grid of Dresspheres has been arranged Rikku will utilise the First Dressphere on the list. For example if Thief Dressphere is first (1st) on the list then Rikku will appear in Thief Dressphere during battle. If Mascot Dressphere is second (2nd) on the list then Rikku will Sphere change into Mascot Dressphere when the Thief Dressphere has been destroyed. If Dark Knight Dressphere is third (3rd) then Rikku will Sphere change into that Dressphere when Mascot Dressphere has been destroyed. This goes on and so forth until all of the Dresspheres assigned have been destroyed of which Rikku will enter her Bare state.

Each Dressphere meets its destruction or zero (0) HP when Rikku loses a certain fraction of her overall HP. Rikku’s HP and MP is made up of the Dresspheres assigned. If three (3) Dresspheres have been assigned and Rikku’s HP results in 2,000 HP then each Dressphere will be destroyed when 500 HP is lost. Say for example Rikku starts off with Thief Dressphere, when her HP is equal to 1,500 (loss of 500 HP) that Dressphere is destroyed and Rikku Sphere changes into the next Dressphere. When a further 500 HP is lost the second (2nd) Dressphere is destroyed and Rikku Sphere changes into her last remaining Dressphere. When her HP reaches 500 HP the third (3rd) Dressphere is destroyed and Rikku will be left in her Bare state. Regardless of the Dresspheres assigned and the amount of HP Rikku has each Dressphere will follow the example explained above.

Unlike in “Last Mission” on Final Fantasy X-2 International + Last Mission the mix of Dresspheres are not shown during battle. The only evidence of a Sphere change occurring is when the Sphere change takes place which will freeze the battle temporarily. The change in Rikku’s appearance, commands and comment from Rikku will also illustrate the effects of a Dressphere being destroyed.

Sphere changing (continued)

Tidus can only perform a Sphere change when the Moogle Mascot Dressphere is available (see Secrets section). If the Dressphere is available the same hint will appear as it does for Yuna for the player to press R1 to open the Garment Grid for Tidus. In this chase Tidus can change from Warrior Dressphere to Moogle Mascot Dressphere or Moogle Mascot Dressphere to Warrior Dressphere. If a Sphere change is prompted by the player the action during battle will stop until the Sphere change is complete. However like with Yuna; Sphere changing takes up his turn and has to wait until the next opportunity

Sphere changing

Sphere changing is what’s known when an active party member changes Dressphere during battle. Only four (4) playable characters have the option to Sphere change; Yuna, Tidus, Rikku and Paine (each of which is mostly unique to the character). For Paine Sphere changing to Dark Knight Dressphere only occurs during her overdrive (Sphere changing does not take up Paine’s turn).

For Yuna the freedom to switch from Gunner Dressphere to Songstress Dressphere or Moogle Mascot (see Secrets section) Dressphere (or in any form) is there when it’s her turn. To access the Garment Grid the player must press R1 (a hint is given in the command window). From here the player can choose which Dressphere Yuna activates and changes into. When R1 is pressed upon the Garment Grid appears on screen (it’s important to note that the battle doesn’t stop while the player is in this menu). To exit this window the player can press R1 again to resume normal command. If a different Dressphere is selected (using X to confirm the Dressphere of choice when the cursor is highlighted upon the particular Dressphere) Yuna will enter Sphere change which will stop anything else going on during battle until the Sphere change is complete. However performing a Sphere change will take up Yuna’s turn and will have to wait until the next opportunity.

Tuesday, 11 August 2009

Final Fantasy X-3 Sphere Grid

As in Final Fantasy X (FFX) playable character’s attributes improve and learn new abilities (that they won’t naturally learn) by moving around a Sphere Grid. In Final Fantasy X-3 (FFX-3) however whereas this may incorporate the same idea and be used in the same way there are differences. As with FFX Sphere Grid the characters tend to follow a set path around the Sphere Grid improving their attributes and learning abilities. Essentially any of the seven (7) characters can learn all abilities and take more roles in battle and max out their attributes. In Final Fantasy X-3 however this is changed so that this time around characters cannot learn new attacks or abilities via the Sphere Grid.

So instead the Sphere Grid is used to improve a character’s attributes such as Strength and Magic. HP and MP can also be improved on using the necessary spheres (although HP and MP will naturally increase as characters level up). Also along with HP and MP increasing after each level up when a character does level up one of their attributes will increase by 1 at random.

When Lenne and Shuyin are playable the process is different. When either level up, improvements in their attributes such as HP are predetermined (check "Lenne's and Shuyin's Story" to find out more). Lenne and Shuyin do not use the Sphere Grid so any improvements in attributes or learning new abilities will come naturally.

AP is used for characters to learn new abilities but it is also used for levelling up. After victory in battle the characters used in that battle will gain AP and eventually with enough AP characters will level up. The higher the characters’ level the more AP is required to level up. In the status window (press triangle to access) CSD is displayed for every character active in the party. To the right is the characters’ Skill Level (S.lv)

The value of a character’s skill level (say three (3) for example) determines how far the character can move around the Sphere Grid. A Skill Level of three (3) allows players to move the character around or across three (3) nodes on the Sphere Grid. After a move to a node the character’s Skill Level decreases by the size of the move. As characters move around in their Sphere Grid players can use Power Spheres and other spheres to unlock nodes nearby and harness the increase of an attribute. Nodes are improvements for the character’s attributes (HP, MP, Strength, Defence, Magic, Magic Defence, Evasion, Agility, Accuracy, Luck, Stamina or Intimidation).

Another crucial difference is not any character can max out all their attributes (strength, HP, accuracy etc.), For example Rikku’s strength is limited to 95 (not including weapon’s attributes) which is miles off Paine’s limit of 255 but in turn max out on agility and evasion unlike Paine who would be slower. The idea being that the player can no longer have three (3) characters and stick with them throughout the game. Each playable character will have their own role to perform in battles as well as strengths and weaknesses for battles with different opponents. Therefore for example against Gemini the player may need Kimahri, Yuna and Paine because there Paine and Kimahri can cut Gemini to size with their high strength and can withstand strong attacks with high defence limits whilst Yuna can use Sing abilities to strengthen the party’s luck, evasion, defence, HP etc. In a different battle situation however these characters may be inefficient against multiple flying opponents such as Grim Gazes and therefore the likes of Rikku, Wakka and Lulu are chosen to battle. Wakka is the only playable character to have a 255 limit on accuracy which allows the player (if wishes to) make it that Wakka doesn’t miss against opponent’s making him ideal against flying fiends which other characters like Paine will find harder to hit. Lulu’s Black Magic can be devastatingly effective because it never misses and can take advantage of any elemental weaknesses in her opponents. Rikku’s ability to Use and Mix will enable multiple and direct attacks on opponents. You get the idea…This is supposed to encourage the player to use strategy and tactics when in battle situations.

One of the things learnt from Final Fantasy X-2 is essentially the player can stick with one Dressphere throughout the game and only need to level up to 32 or so because it was much easier to max out the characters attributes and just take out any opponent without thinking strategy. In Final Fantasy X it is possible to reach 2/4 of the game without using the Sphere Grid but in Final Fantasy X-3 there will be more difficult battle situations more of the time making it almost necessary to use the sphere grid as soon as possible and get the hang of using it. This divide of the Sphere Grid and limitations on each of the characters changes the perspective of role playing. Essentially in FFX the player can have three (3) characters have all abilities and maxed out attributes so that those characters can cover the many roles in battle such as using White Magic to heal allies. In essence it’s the same that can be done in Elder Scrolls IV Oblivion. And in FFX-2 the characters could assume these roles by Sphere changing (changing Dressphere) whilst in battle. In FFX-3 however this is changed so that it encourages the player to use a much wider range of tactics and play more of each character during battle.

Since there are ten (10) attributes there are ten (10) links. Every character starts at the centre of the sphere grid and using different kinds of spheres to activate attribute nodes the characters can move along these ten (10) links. Each link corresponds to a different attribute. For example the link open to Paine would have mostly Strength attribute nodes as well as HP and MP nodes. Another link would be based primarily on Agility. However some links have a mixture of two (2) different attribute nodes for example the links next to Lulu and Baralai will have ten (10) nodes each of Magic and Magic Defence.

The value of each node varies from such attribute improvements like Strength +1 or HP +200. Some nodes have higher values such as +3, +4, +400 or +40. Each link in the Sphere Gris contains thirty (30) nodes. Each link has five (5) HP and MP nodes. Each link will have higher value nodes for both HP and MP (just like there would be for Strength, Defence, Magic, Magic, Defence, Agility, Accuracy, Evasion, Luck, Stamina and Intimidation).

Nodes and Spheres

To activate nodes on the sphere grid you need spheres. Nodes contain an increase for a given attribute. For example a HP node when activated will give the character 200 HP. To activate nodes you need spheres. There are as many different spheres as there are nodes in FFX-3 but relating to the sphere grid are particular spheres that will activate certain nodes.


Spheres can be obtained during, after victory in battle, finding or by reward. Most of the time spheres will be salvaged from the aftermath of a battle. When a battle is successfully won; AP is rewarded to those characters who were involved. As well as that items are salvaged such as potions, weapons and spheres. During battle commanding Rikku to use Steal on an opponent (if successful) will also allow the player to obtain items and spheres. Chests are littered all over Spira and contain useful items such as Phoenix Down, Gil or spheres. The last way to obtain spheres is by completing missions during the course of the game and receiving a reward.

DO NOT get these kinds of spheres confused with music or movie spheres. Music spheres can be obtained from the airship sphere theatre as well as movie spheres. However movie spheres can be obtained as a reward by completing missions or finding them. In FFX-3 there are many types of spheres that can be obtained which are used for different purposes.


Developing characters

1. Characters that are involved in a battle situation are rewarded with AP following victory. Spheres are sometimes salvaged from after the battle. AP increases a character’s Skill Level (S.lv).
2. Select sphere grid from main menu (press triangle to open main menu and select sphere grid using X).
3. The sphere grid will appear and will show a close-up of where the character is located. Use select to zoom and L2 and R2 to tilt grid.
4. Select Move in the new window to move the selected character. Accessible nodes are highlighted. You can enter one new node per S.lv or you can cross the highlighted nodes. Confirm Move.
5. Select Use if you are on or directly beside a node which has yet to be activated. A new window will appear listing your spheres. Available/useable spheres are highlighted in white.
6. Select the useable sphere on node. Press X to confirm your decision or circle to cancel.
7. The node has been activated and your character has increased an attribute. Now you can see a small coloured mark circling the node (see the Colours on Sphere Grid selection). Either continue or press triangle to view your character’s attributes. You can switch characters using L1 and R1. Press circle to return to the main menu.

Colours of the Sphere Grid

At the start of the game some nodes are not activated and are therefore grey. Once a node is activated it will light up. However if you switch to another character, the node will be grey again since it has not yet been activated by the relevant character. Each node has nine (9) small squares arranged around it. If one of these lights is active it means the node is already active for that character. The following colour code is used to denote the various characters. (Incidentally the same colour applies for that character in the story of FFX-3 for whenever that character is talking.)


Monday, 10 August 2009

Character Status Display (CSD)


In battle a window on the bottom right of the screen shows the information/status of the active characters in battle. This shows a character’s status such as name HP, MP and the three (3) gauges (overdrive, turn and stamina).

The gauge for an Overdrive sits at the top in yellow. When the gauge fills to the end it turns orange to indicate that character can perform an Overdrive.

The middle gauge is the build up for next move The gauge fills automatically when the character is in battle and isn’t petrified, asleep or KO’d. As the battle rages the gauge will fill; whilst it fills that character cannot take a turn. Only when the gauge is full can that character take a turn. After the turn is over that character has to wait until the gauge fills to the end to have another turn.

Stamina The gauge is the indication of how much stamina a character has left. In battle this gauge will deteriorate and slowly plummet to the left end. When the gauge is light blue it means the character has plenty or sufficient stamina. When it reaches the near left end it will turn blue (darker) indicating the character is running out of stamina. The body language of the character will also indicate when he/she is running out of stamina as he/she would begin to breathe heavily/pant fall to their knees.

However in FFX-3 there is the option of two (2) CSDs. The one on the left (Modern) involves a permanent display of a character’s damage to body parts and limbs. The Stamina gauge sides to the left side of body damage indicator. The Overdrive gauge appears on the right. The Momentum gauge appears amongst a character’s other battle data such as Name, HP and MP. Like in the “Classic” CSD the gauge the Stamina gauge will decline and darken as the character’s stamina worsens over time in battle. The Overdrive gauge builds upwards and changes colour when the gauge is full, enabling the character to perform an Overdrive.

The advantage with this CSD is that the player is given a constant picture of a character’s damage to body parts and limbs by Strategic Damage. That way the player can see and analysis a character’s position and ability to fight. Also the display of gauges is tidier then it is in the “Classic” CSD which makes it easier for the player to monitor each individual gauge. However because it’s a newer approach players familiar with previous Final Fantasy CSD may find the “Modern” CSD difficult to use at first.

The “Classic” CSD (on the right) sticks to familiarity with other CSDs from previous Final Fantasy games. Those familiar with FFX and FFX-2 CSD in particular shouldn’t find much of a problem with the “Classic” CSD setup. It is a familiar CSD to the majority of players and it works because it has been used in other titles. All three (3) gauges (Stamina, Momentum and Overdrive) are aligned together along with the character’s battle data.

However with the introduction of Strategic Damage and a need to keep the CSD tidy the body damage indicator is mostly unseen during battle. When damage is inflicted to a body part such as the arms (depending on the severity of the attack) the body damage indicator pops up and shows the affected area. This data is displayed for only a few seconds and disappears. Say for example the arms of a character have the colour red on the body damage indicator. The body damage indicator will show this data briefly and then disappear. After two (2) turns (depending if whether the character isn’t attacked in that area again or is KO’d, Petrified or Ejected) the body damage indicator will pop up again to show the damaged arms that were red have turned to orange indicating the character’s recovery. A turn later the indicator will pop up again showing the arms in yellow (proving the area isn’t attacked upon). After the next turn the indicator will appear clear indicating that no damage to the previously targeted area. In essence with the “Classic” CSD the indicator will only appear if damage has been sustained to a particular body part and appear briefly so it doesn’t distract the player. However because of this setup its much easier to ignore any damage inflicted to a character’s body parts because the indicator appears very briefly.

The decision for which one the player goes for is entirely up the player’s decision. If the player prefers familiarity and it good enough to avoid the majority of incoming (physical) attacks then the “Classic” CSD would be best. On the over hand if damage occurs often its better to opt for the “Modern” CSD. Fortunately there’s no need to pick one and stick with it; the player can choose which CSD he or she prefers and switch back and fourth if necessary via the Main Menu, Options

Sunday, 9 August 2009

New features (continued)

Pounce (new)

Like Strategic Damage, Pounce is exclusive territory of either a fiend or a boss. The idea is that if one of the active characters battling is affected by Sleep, Petrifaction, depleted of his/hers stamina or reduced to half his/hers HP; the character would be in danger. In this situation an opponent can perform what’s known as Pounce. It is the opposition’s answer to the Overdrive in some extent where the opponent can critically damage a downed character multiple times or finish off the character.

Let’s picture a battle and in it Tidus HP is reduced to half his total amount. As a result of this can been shown on the CSD Tidus will show a sign of weariness. In this given situation a fiend (Wild Wolf for example) can use Pounce to take Tidus down and inflict additional if not multiple damage. Depending upon the player’s actions, the amount of HP left and the setting of the fiend’s attribute of attack (Strength or Magic) the Pounce manoeuvre can be devastating.

When a Pounce is imminent there is a safeguard that allows the downed character to dodge the Pounce or prevent it. At the moment of the opponent’s Pounce the player is prompted to press the button prompted on screen in time to counter the Pounce. For example when a fiend is about to Pounce on Yuna who has less then half of her overall HP remaining the player can press the Triangle button (as shown) when prompted to evade the Pounce. This safeguard is available for all playable characters when in downed position as defined above. However the opportunity to evade Pounce lasts very briefly and in some circumstances where the downed character is either affected by Sleep, Curse, Stop or Petrification the Pounce is unavoidable.

If the player is unable to evade Pounce the attacked character will be attacked which can lead to multiple and critical if not even fatal damage caused. However in this situation (provided the downed character is not affected by Sleep, Curse, Stop or Petrification) the player can follow the button display shown on screen and follow it with his/hers matching inputs to getup or kick out of Pounce. In this situation a display of the four (4) buttons, X, Circle, Square and Triangle appear on screen providing which button lights up the player much match and continue to follow in order to break out of Pounce and prevent further damage done.

If a character is petrified and an opponent goes for Pounce on the petrified the outcome will result in Break. The petrified character is broken into pieces and can no longer be usable in battle or brought back into the fray. In a three (3) or two (2) way party the player loses a position for a playable character to enter the fray. In other words if the player has three (3) characters battling but one (1) is then petrified and broken the party is reduced to two (2) characters. The thing is to not get it confused with the effect of physical attacks, abilities or Magic on petrified characters. If an opponent does not opt for Pounce upon a character affected by Petrification the petrified character is still prone to Break via physical attacks, abilities or Magic but in order for the petrified character to be broken the attack or Magic spell of the opponent needs to be critical/strong enough to force Break.

In other circumstances such as Sleep, Curse and Stop the downed character will be unable to defend him/her self when Pounce occurs. Neither will the four (4) button display show up. The effect of Pounce will last until the opponent has finished attacking or casting spells on the downed character (which lasts for six (6) seconds) or the downed character is KO’d. If however the downed character still has HP remaining the effect of Pounce will clear the negative status effect on the downed character. Say like a person who’s sleeping is disturbed that person will awaken. This is what happens if a character is affected by Sleep, Curse or Stop and remains active in the given battle situation.

New features

The opposition

Whether it’s playing FFX or FFX-2 battles have either been with fiends or bosses. With boss battles being more of a challenge fiend battles are more like for practicing and gaining experience. FFX-3 is set to be different however this time around there are a couple of surprises in store.

Strategic damage (new)

In almost all RPGs including Final Fantasy when a character takes damage from an opponent the character would react by losing HP in the CSD. If more damage is sustained overtime during a battle the character will become pretty beat up, show signs of slowing down like for example falling to one knee before being KO’d. When it comes to physical attacks the some opponents comes towards the character targeted and then attack. Those opponents that prefer elemental spells such as Thunder say still opposing the characters.

But I think its time to involve a little strategy and tactics to make the opponents smarter and make the character’s job more difficult. The idea is that each character is a being (of some sort) with a head, torso, arms and legs (well duh…) and each (in particular to arms) play a crucial part in battle. For example: when Paine goes in for an attack she uses her arms to strike the opponent with her sword. Now what would happen if opponents realised this and try to take that offensive out of Paine’s arsenal? In the same way that when a character loses half (1/2) of his or hers HP they become battle weary and show signs of struggling to stay up. The idea behind this “Strategic damage” is that the opponents can somewhat neutralise parts of the character’s being to stop them in some way. The idea goes as follows:

In the CSD there is a small clear silhouette figure be siding the momentum, Overdrive and stamina gauges for each character (see image above). This serves as an indicator of the character’s being in the same way that HP and MP on the CSD are represented (not in figures but a clear readout if the player doesn’t notice the character’s motions). The black symbolises “safe” and no damage done. The head, torso, arms or legs area will change colour depending on the amount of damage inflicted.

The head is least protective area and if an opponent strikes there critical damage (more damage) will be done to the character then an attack on any other part of the character’s being. It is the clear weak spot and the almost sure way of KO’ing the character with physical attacks. However opponents will find it more difficult to go for the head since it’s a less obvious part of the character’s being to attack and harder to reach. The faster and more agile opponents would be better at going for the character’s head.

Ø If the head area is clear it means no damage done
Ø If the head area is yellow it means slight damage has been done (it will turn back clear after the next turn)
Ø If the head area is orange it means sufficient damage has been done (damage taken will be higher as a result (it will turn back to yellow after the next turn and then clear the next turn afterwards)
Ø If the head area is red it means the next attack will be critical (the attack must be substantial enough) (it will turn orange after the next two (2) turns, then yellow the turn afterwards and then back to clear the next turn after)

The torso is the most obvious target area of the character’s being. Like in the predecessor titles damage would be standard and in many ways it won’t bother the character too much if the attack isn’t sustainable enough. And it is better defended (naturally). However attacking the torso the opponents are more likely to cause the character to flinch and miss an opportunity to have a turn.

Ø If the torso area is clear it means no damage done
Ø If the torso area is yellow it means slight damage has been done but won’t cause the character to flinch (it will turn back clear after the next turn)
Ø If the torso area is orange it means sufficient damage has been done and the chance of the attack causing the character to flinch increases (damage taken will be higher as a result (it will turn back to yellow after the next turn and then clear the next turn afterwards)
Ø If the torso area is red it means the next attack will cause flinching guaranteed (the attack must be substantial enough) (it will turn orange after the next two (2) turns, then yellow the turn afterwards and then back to clear the next turn after)

The arms; most physical attacks require the use of the character’s arms to strike the opponent with their weapon. Taking the arms out of play will disable the command Attack for a brief while leaving the character to take a different command.

Ø If the arms are clear it means no damage done
Ø If the arms are yellow it means slight damage has been done but it won’t disable the command Attack (it will turn back clear after the next turn)
Ø If the arms are orange it means sufficient damage has been done and the command Attack will be disabled until the area turns yellow (it will turn back to yellow after the next turn and then clear the next turn afterwards)
Ø If the arms are red it means the command Attack will be unusable until the area turns yellow (it will turn orange after the next two (2) turns, then yellow the turn afterwards and then back to clear the next turn after)

The legs are the less obvious target area of the character’s being. However if opponents where to do substantial damage to the character’s legs it will temporally destroy their vertical base which means they become slow in their build up for their next turn.
Ø If the legs are clear it means no damage done
Ø If the legs are yellow it means slight damage has been done but it won’t slow down the character’s momentum (it will turn back clear after the next turn)
Ø If the legs are orange it means the character’s momentum will be slowed to half’s its normal speed (it will turn back to yellow after the next turn and then clear the next turn afterwards)
Ø If the legs are red it means it means the character’s momentum will be slowed to 1/4 its normal speed (it will turn orange after the next two (2) turns, then yellow the turn afterwards and then back to clear the next turn after)

When damage has been sustained to limbs, the arms for example (and if sufficient) that character (as well as showing trouble with his/hers arms (for example Wakka may have his left arm hanging and his right arm covering above the elbow) the command Attack will be unusable for a brief moment. With legs as well as showing a similar effect to trouble with the arms (for example Rikku may fall back and be rubbing her knee/thigh) the middle gauge in the CSD which is the build up for next move (which fills up automatically whilst the character is in play) will be much slower temporally. (Mustn’t get it confused with the Slow effect as damage to the legs is a temporary delay whereas Slow is a permanent effect unless lifted.)

Now if you’re reading this you’ll be thinking “you’ve got that idea off the Smackdown VS Raw series didn’t you?” And you would be dead right. However I do think by incorporating some aspect of it into battle situations in FFX-3 it does offer a new aspect to battles which requires the player to think carefully. One problem noticed with the battles in FFX-2 is when the Strength of YuRiPa or YRP (Yuna, Rikku, Paine) is substantial enough the player can simply opt for the Attack command and defeat the essential opponents such as Vegnagun or the aeons. The only way this type of offensive could be stopped was if a negative status affect like Petrification, Sleep, Slow etc. was inflicted upon the characters. By incorporating this “Strategic damage” opponents can potentially turn the tables on the characters enough to defeat them. If the arms have taken damage the command Attack will be unusable temporarily (depending on the amount of damage caused). By doing this it will encourage the player to take more decisive action such as Black Magic which may not be the given character’s particular strength and use up their MP.

Thursday, 6 August 2009

Auron

Otherwise known as: Sir Auron, Legendary Guardian
Age: 38
Specialty: Bushido
Ability to swim: No
Auto Abilities: Armour Break, Power Break, Mental Break, Haste
Additional: Auto Med
NOTE: Auron has no Overdrive or Special Overdrive

Regarded as the legendary guardian who twice saved Spira from the terror Sin Auron is a man who shares extremely few words and prefers his powerful blade to end the sentences. To many he is the legendary guardian. To Yuna’s father Braska and Tidus’ father Jecht he is their friend. But Auron rarely lets his emotions distract him from his goal. Hardened by death and battle Auron is a powerful fighter even when the Calm over Spira is eternal.

Highly favourable in close range combat, powerful and a master of Bushido Auron is a powerhouse. However he is somewhat sluggish and only playable when the party confronts the Farplane.

Due to this his status, attributes, abilities and weapon are unchangeable. Strength 80, Defence 100, Magic 36, Magic Defence 56, Luck 29, Agility 16, Accuracy 40, Stamina 140, Intimidation 145.

Opportunities when Auron is playable:
Chapter three (3) - Farplane
Chapter four (4) - Farplane
Chapter five (5) - Farplane
Final chapter - Farplane

Shuyin

Age: ???
Specialty: Warrior
Ability to swim: No
Auto Abilities: Hit & Run, Spin Cut, Use
Additional: Haste when HP falls below ½, Double Overdrive
NOTE: Shuyin's Overdrives; Force Rain and Terror of Zanarkand does not have a minigame like Tidus has for his variations of the Overdrives (Energy Rain and Blitz Ace)

A renowned BlitzBall native of Zanarkand who lived during the age of the Machina War. He loves the songstress-summoner Lenne. He refused to accept her fate when she was ordered to the front lines (from which she will probably die) and attempted to commander Bevelle's machina weapon, Vegnagun, in the hopes of using it to end the war and save Lenne. But, they were gunned down after Lenne prevented him from using Vegnagun to take many lives for her sake. Sealed in the Den of Woes, Shuyin's unsent spirit-filled with despair and self-loathing-cannot fade away and be free of his suffering. Shuyin desired to destroy all of Spira in the hopes that his agony may be able to end and that there can never again be a war like the one that cost him and Lenne their lives. However it was after his defeat and the destruction of Vegnagun that he and Lenne were finally reunited after 1000 years.

In many ways he is strikingly similar to Tidus beyound appearances. Like Tidus he has a contrasting attitude to Lenne just as Tidus to Yuna during Yuna's pilgramige. Shuyin is at times self confident and knowledgeable of certain things on Spira. Similar to Lenne he has a strong sense of what is right and believes in his duty but doesn't appear pessimistic and won't oblige to traits such as sacrificing for the greater good. He dislikes war just as much as Lenne but dislikes being away from Lenne more and will go to any length to save her.

Likewise to Tidus, Shuyin is a capable Warrior. Although not as agile as Tidus, Shuyin is stronger and more intimidating. They share many abilities as well as appearance and attitude however such ability for Tidus such as Slice & Dice is known as Hit & Run for Shuyin. Likewise to Lenne, Shuyin can build up for an Overdrive or Special Overdrive more quickly and use Use.

Overdrive

Force Rain (Has the same effect as Energy Rain)
Mode: Warrior = the gauge fills after Shuyin inflicts damage.
Shuyin will attack all opponents with an increase in Strength of +10.

Terror of Zanarkand (Has the same effect as Blitz Ace)
Shuyin will attack one opponent nine (9) times.

Special Overdrive

Lenne & Shuyin: Assault from Zanarkand
Lenne’s and Shuyin’s Special Overdrive only comes available when both are battling and both have their Overdrive gauge filled. Lenne will appear on a stage with a microphone in hand to perform of which her opponents will see and hear the last of. After “distracting” or “deafening” her opponents she calls Shuyin over to take care of their opponents. Shuyin throws numerous Blitzballs at his opponent(s). When their opponent(s) look up they see their impending doom as Shuyin crashes down with his sword cutting them down to size. It’s a three prong assault! Lenne’s scream inflicts moderate damage to all opponents, the Blitzballs thrown also do moderate damage and Shuyin’s final cut delivers heavy damage that will mark the end of the assault (providing both Lenne’s and Shuyin’s Strength is substantial enough).

Lenne

Age: ???
Specialty: Songstress
Secondary ability: Summon (only available in "Lenne's and Shuyin's Story"
Ability to swim: No
Auto Abilities: Darkness Dance, Sleepy Shuffle, Savour’s Song, Battle Cry
Additional: Depletion Dance when HP falls below ½, Double Overdrive

A famous singer and equally gifted summoner from Zanarkand during the age of the Machina War, she is Shuyin’s sweetheart but as the Machina War tore though it brought about their lives after being struck down by their enemies after Shuyin attempts to use Vegnagun to defeat Bevelle but is stopped by Lenne. Being separated from the man she loves it was 1000 years later that with the help of Yuna Lenne and Shuyin are reunited.

Lenne has a deep understanding of the fires of war and the death it brings. Lenne understands what goes though Yuna’s mind having been intertwined whenever Yuna donned her Songstress outfit. Lenne is more of the moral minded individual who thinks before she acts and can find sense in outcomings which others may not. Most times Lenne will put duty or a mission before her personal feelings or well being. This brings about some of her unfortunate pessimistic behavior and a lack of trust in herself. But at times she will act out of character and show more of a positive and personal side. This is mostly evident whenever she is with Shuyin.

Lenne's passion is to sing and perform. Lenne has the ability to distract and put an end to fueds and fighting whenever she sings as evident with a 1000 Words which put a stop to the rivaly between New Yevon and the Youth League. Commonly Lenne uses tempo and musical related vocabury such as adagio which means slow or at ease and morendo which means dying. Being a songstress its perhaps not suprising but what is Lenne's imagination which at times even baffles Lenne. Lenne can imagine herself in very different situations and using things related to games such as snakes and ladders, Jenga, chess and so on. Lenne can't help it and can't help but be confused or disillusioned at times even after a 1000 years. Only Yuna is fully aware of the things Lenne imagines and sees it as Lenne's way to make a bad situation seem not so bad in compassion to thinking of worse situations or thinking strategically.

Similar to Yuna (when Songstress) physicality isn’t her best asset. Her strength rests in her abilities to Sing (helping allies) and Dance (inflicting status affects on opponents). Though not as agile Lenne can use the command Attack (which Yuna (when Songstress) can’t). Although that said her Strength status isn’t something to boast about. Lenne’s Sing and Dance abilities have a stronger effect on opponents then Yuna’s (when Songstress). Another command she can perform is to summon an aeon into battle to take the party's place in battle situations.

Overdrive

Sound of Zanarkand
Mode: Ally = the gauge fills every time it’s Lenne’s turn.
Lenne will begin to sing and dance. The amount of HP recovered and damage inflicted reflects upon how accurate the player is matching the button commands displayed on screen. This setup is similar to that of “Rehearshal’s Shtarting?” during Chapter 4, Final Fantasy X-2 where the player is prompted to match the button command when shown on the sphere. The more matched the greater the damage dealt to opponents at random and the more of Lenne’s HP is recovered. If no button commands are matched no damage will be inflicted and no HP will be recovered.

Special Overdrive

Lenne & Shuyin: Assault from Zanarkand
Lenne’s and Shuyin’s Special Overdrive only comes available when both are battling and both have their Overdrive gauge filled. Lenne will appear on a stage with a microphone in hand to perform of which her opponents will see and hear the last of. After “distracting” or “deafening” her opponents she calls Shuyin over to take care of their opponents. Shuyin throws numerous Blitzballs at his opponent(s). When their opponent(s) look up they see their impending doom as Shuyin crashes down with his sword cutting them down to size. It’s a three prong assault! Lenne’s scream inflicts moderate damage to all opponents, the Blitzballs thrown also do moderate damage and Shuyin’s final cut delivers heavy damage that will mark the end of the assault (providing both Lenne’s and Shuyin’s Strength is substantial enough).

Baralai

Otherwise known as: Praetor of New Yevon
Age: 21
Specialty: Multi Black Magic
Secondary ability: Element Switch
Ability to swim: No (however he does compete in Blitzball and Blitzbase because Gippal forces him to)
Auto Abilities: Water, Fire, Thunder, Blizzard
Additional: Black Magic preparation time ½
NOTE: Switching magic element takes up a turn.

Praetor of New Yevon, Baralai is a serious young man whose resolve rests on restoring trust and peace though Spira. However making the people of Spira trust Yevon after Yuna and her guardians fought and vanquished Sin was difficult and fractions such as the Youth League and Machine Fraction. And his rise in becoming praetor of New Yevon remains a dark secret which if the people of Spira knew would throw New Yevon in dire straights. A year ago Shuyin manipulated his mind and he was driven to destroy Spira but thanks to the High Summoner and friends he realised his wrong doings and swore to maintain peace during the Eternal Calm.

As mentioned he is the serious type and would prefer if things went according to plan. But most times situations get out of hand and he cannot act as well when choas isn't overcoming. When this happens he is eager to understand what's going on and will ask if he is unsure about anything with a bit of hesitation at times. He shows a more relaxed self in the comfort of friends and in particular he gets along well with the Gullwings, Nooj and Gippal.

In particualr he acts formally when he is in the pressence of Yuna. He has the greatest respect for Yuna but is also at times afraid of her too. He won't forgive himself if he troubles Yuna and unlike his friends and others he will address her as "High summoner" rather then calling her by her name.

Baralai is a skilled warrior but his experts highly in Black Magic. Although not as powerful as Lulu, Baralai is capable of unleashing multiple Black Magic spells. For example if Baralai casts a Fire spell it will affect all opponents instead of one at a time. Baralai is also able to change the elemental status of magic like Spherimorph. This way if facing electric element opponent’s Baralai can switch his element status to lightning so that damage inflicted by lightning spells heal him. However this makes Baralai slow in battle and whatever magic element he is he will be weak against the opposite element such as Water.

Overdrive
Element Uppercut
Mode: Victim = gauge is replenished when Baralai suffers a status effect due to an opponent’s attack.
Using his spear Baralai sends an opponent flying into the air of which then the opponent is attacked by a strong elemental spell (Water, Fire, Lightning or Ice depending upon Baralai’s elemental characteristic (i.e. Lightning does minimal damage). The opponent then takes further damage by crashing into the ground below. Even if the opponent benefits from the elemental spell the opponent will still suffer a two (2) prone assault from being launched into the air and crash landing.

Special Overdrive
Guardian Angel
Baralai’s Special Overdrive is unique and odd compared to others but essentially very effective and almost ensures victory. Similar to the circumstances in the decisive battle in FFX the party cannot lose because when one is KO’d he or she is brought back by Auto-Life. Essentially it’s the same here only it affects Baralai giving him immortality until the battle is won. Once called upon Baralai will be automatically brought back to life whenever he is KO’d. However the effect doesn’t protect from Petrification or Eject. This Special Overdrive can only be used once per battle. This immortality effect will be lost if Baralai is switched during battle.

Gippal

Otherwise known as: Learder of the Machine Fraction
Age: 19
Specialty: Using Machina
Secondary ability: Gunner
Ability to swim: No (although he will play BlitzBall and Blitzbase)
Auto Abilities: Mortor
Additional: In battles the active party’s initiatives increases (when selected).

Gippal is the leader of the Machine Fraction; an Al Bhed group that uses machina. A former member of the Crimson Squad and friends with Baralai, Nooj and Paine but when the squad was destroyed before it could get of the ground they went their separate ways and now is the leader of the Machine Fraction that rivals the Youth League and New Yevon. A year ago the incident involving Shuyin and Vegnagun reunited him with his friends and together they swore to ensure the Eternal Calm will continue by maintaining peace. In particular he is good friends with Rikku and at times teases her but its unknown how far their relationship goes.

Gippal is relaxed, cool headed and won't see danger in the same way as his friends. He is confident in his abilities and his own believes in particular he believes that everyone on Spira have to be able and capable of sorting out problems themselves and build a way to Spira's future without relying on the high summoner to solve everything. He values his friendship with his friends and doesn't struggle to make new ones. In particular however he keeps a close eye on Rikku and would show a more compassionate side if she were in danger.

Gippal’s strength rests upon the usage of machina. He personally wields a large machina that he fought Vegnagun with. The machina he uses is large and heavy but even so Gippal can use it for melee attacks and long range attacks. This makes Gippal incredibly strong and a sound choice against slower opponents. In addition he also carries a handgun that makes him a Gunner however he is not as skilful as Yuna and equipped with the handgun he is rather arrogant and takes his time when attacking.

Overdrive

Airburst
Mode: Hero = the gauge is replenished when Gippal delivers the final blow to a powerful opponent (for example an opponent that has more then 10,000 HP.
Gippal uses his machina weapon to fire upwards and cause mortars to rain down on all opponents. Airburst stops when six (6) critical hits are inflicted upon the opponents.

Special Overdrive

Machina Air strike
This is what happens when Gippal has to resort to desperate measures; Gippal will call in for machina support which will essentially take over in battle until destroyed. The attacks the machina will use are automatic; you don’t command it and it won’t stop unless it is destroyed or the opponents have been destroyed. The machina will vary from a Crawler to a swarm of Mech Defenders, Guards, Gunners and Hunters. In any case whatever machina arrive Gippal will do nothing but watch but essentially he doesn’t take damage whilst the machina are in play.

Kimahri

Otherwise known as: Elder Kimahri
Age: 28
Specialty: Lancet
Secondary ability: White Wizard
Ability to swim: No
Auto Abilities: Lancet, Pray, Cure, Esuna
Additional: SOS Overdrive when health falls below 1/2, SOS Shell when party’s health falls below ½.

Kimahri Ronso is Elder at Mt. Gagazet after the vanquishing of Sin and the near extinction of the Ronso race by Seymour three (3) years ago. Before that however Kimahri was another one of Yuna’s guardians and of which he has been with since the age of seven (7). Kimahri is very protective of Yuna but during the events with Vegnagun Kimahri faces difficulties being Elder to Ronso who feel hatred for the Guado. Things are calm and since then Kimahri is wiser and self esteemed until shaken by sudden activity which he fears Yuna is in grave danger.

Though more talkative then he was during Yuna's pilgramige Kimahri only speaks when he feels its necessary or when he is adressing to his companions. His experiences have made Kimahri wise and protective of properties and individuals that matter to him. His duty as Elder on Mt. Gagazet is a priority but no more then protecting Yuna and would run most obstacles to ensure her well being when he knows danger is plaquing her.

Like Paine; Kimahri is a taciturn warrior who prefers actions to words however whereas not as formidable as Paine Kimahri is more agile and overall a better all rounder in close-combat. Using Lancet enables Kimahri to learn new attacks and spells. Using Lancet also fills Kimahri’s overdrive instantly however his attacks are solo opponent based meaning he can only concentrate on one fiend at a time. Similar to Yuna’s secondary ability (Songstress) Kimahri’s second ability can provide support for party members. His knowledge in White Magic allows him to heal, cure and protect other party members however Kimahri doesn’t learn magic like Hastega or NulBlaze where it affects all characters. Mostly Like attacking Kimahri can only affect one character each time.

Overdrive

Ronso Rage
Mode: Avenger = alternatively Kimahri’s overdrive gauge will be replenished when an ally is KO’d by an enemy attack.
Kimahri can use any abilities learnt from opponents using Lancet as Overdrive techniques. Kimahri’s Overdrive gauge will be fully replenished each time Lancet is used and it results in Kimahri learning a new ability.

Special Overdrive

Bitterness of Gagazet
Using strength from the mountain Kimahri unleashes heavy damage where it’s guaranteed to deliver a Critical Hit. Kimahri’s spear becomes encrusted with the coldness of Mt. Gagazet and the rage of the Ronso tribe which Kimahri uses then to shatter opponents (delivers Death). Opponents immune to death will undergo extreme pain that is more then likely going to KO. Kimahri’s Special Overdrive is difficult to pull off because of SOS Shell and White Magic that is used to protect his comrades but when Kimahri does unleash this overdrive the opponents will hear no sympathy from Mt. Gagazet.

Paine

Age: 19
Specialty: Warrior
Secondary ability: Dark Knight
Ability to swim: No
Auto Abilities: Darkness (Dark Knight), Power Break (Warrior)
Additional: Berserk on Paine and Haste on party (when selected).
NOTE: Unlike Yuna’s Sphere change Paine can battle after Sphere change. Likewise the action in battle stops while Sphere change (Paine’s overdrive) takes place.

Generally quiet and taciturn Paine seems reserved and a bit of a killjoy but underneath the stiffness and maturity Paine is compassionate and more fun to be with then first impressions. In the face of Rikku’s silliness Paine tends to reply sarcastically. Her relationship to Yuna is perhaps deeper then with Rikku when Paine talks about her past and about how they should perhaps let go of their pasts. After the showdown with Shuyin and the destruction of Vegnagun Paine was able to find the answers to her past and now moves on working with her friends Nooj, Baralai and Gippal to maintain peace in Spira.

Usually Paine won't express her concerns or feelings unless she feels its urgent for she gets a feeling that something bad is going to happen. Capable of fighting and defending for herself Paine won't lose her cool even when things look bleak. That said she enjoys the company of her friends and would rather be in a team rather then go it alone. She is very protective of her close friends in the Gullwings and Baralai, Nooj and Gippal.

Paine is a talented sword fighter who prefers to let her actions do the talking. Capable of using large swords and darkness Paine is seemingly the strongest character in the party but at the cost of strength and defensive capabilities it makes Paine one of the slowest. When desperate measures are needed Paine will become a Dark Night where she can use Darkness and Black Sky to cut down opponents. Paine can be heavily depended upon when the goings gets tougher.

Overdrive

Dark Knight (requires Warrior Dressphere)
Mode: Slayer = the gauge fills when Paine defeats the opponent (must be final blow).
Paine must be in Warrior Dressphere to become a Dark Knight. Strength and defence is increased dramatically. Paine can now use Black Magic to deal out powerful spells as well as devastating attacks however Paine will switch back into Warrior Dressphere after five moves in Dark Knight. A reminder on top of Paine will remind the player of how many turns are left. If Paine is using the Dark Knight Dressphere when the battle ends and another begins Paine will remain a Dark Knight onto the five turns are up. The overdrive gauge doesn’t fill up whilst in Dark Knight; must be back in Warrior Dressphere. Requires Dark Night lv.2 and Dark Knight Lv.3 in order to use all abilities.

Special Overdrive

Full Throttle
Full Throttle is Paine’s special Dressphere and in this call for desperate measures Paine unleashes her most powerful attack Swords Dance. Swords Dance is a two (2) part attack which is ideal for striking down a swarm of tough opponents. Although it hasn’t the ability of delivering a Critical Hit it is easily the most powerful attack the party has which should eliminate anything that stands in Paine’s way.

Rikku

Age: 17 (soon to be 18)
Specialty: Theif
Secondary ability: Mixing It Up
Ability to swim: Yes
Auto Abilities: Steal, Use, Item hunter
Additional: Allows active party to use the ability Use (when selected).
NOTE: Only Rikku’s Dressphere’s can be destroyed (this doesn’t apply when using her Special Overdrive).

After finding her cousin Yuna Rikku has been with her ever since. Her bubbly character and endless enthusiasm makes it easy for her to make friends and provide encouragement to others. At times however it’s this taking life seriously the least that leads them into trouble. Rikku is hardly outspoken and optimistic but in the presence of Gippal Rikku appears to be bashful. Maybe it’s because she wants to be more like Lulu and at times where Gippal is present it makes her think about life more seriously.

Its often when her friends think of her they find something good to think about and optimism. Rikku will rarely show cowardice or anything but 100% commitment to whatever she sets herself. Extremely loyal to Yuna, Rikku would go along with her and makes doubly sure nothing bad happens to her or any of her friends. Perhaps the person she gets along with better then anyone else is Tidus as she values him like a brother. But more and more Rikku grows inpatient and when mad she won't hesitate to express herself even if it starts an arguement with her friends.

Rikku utilises unique abilities to Mix items as an Overdrive and stealing items, gil, rare items and amongst other things. Added to this Rikku is the only character who can create an order of five (5) Dresspheres for battling (as utilised in Last Mission of Final Fantasy X-3 International + Last Mission). The option to change, manage Dresspheres for Rikku is found when Rikku is selected from the option Status. Although you don’t have to set up a combination of Dresspheres it is well advised to do so to maximise Rikku’s efficentcy in battle for each Dressphere as its set amount of HP and if the HP for the current Dressphere worn reaches zero (0) the Dressphere will break. If there is another Dressphere set in line Rikku will Sphere Change into the next Dressphere however if there are no more Dresspheres after the initial Dressphere is destroyed Rikku will enter the Bare state which reduces Rikku to commands Attack and Item. Strength, Defence, Magic Defence and Intimidation are at their lowest whilst in the Bare state. With the use of different Dresspheres Rikku can utilise many different commands depending upon the current Dressphere.

Rikku is physically weak and not ideal going against larger fiends. However her quick feet and evasion allows her to dodge attacks. Her attacks aren’t anything to write home about but against a group of fiends her ability to use multiple Dresspheres give her good variety and her Overdrive Mix is more then helpful. Rikku’s agility also allows her to steal items from fiends which she can then use on them in the next turn.

Overdrive
Mix
Mode: Tactician = the gauge increases when Rikku inflicts a negative status effect on an opponent (poison for example).
Rikku will combine two (2) items from the inventory of the player’s and then Rikku picks a third item from random and combines the lot. The result can produce unique and offensive and defensive effects.

Special Overdrive

Machina Maw
As her final resort Rikku uses her special Dressphere Machina Maw to perform Vajra which deals heavy physical damage to opponents. Unlike other Special Overdrives the Machina Maw’s Vajra is a single attack but it does deliver the chance of a Critical Hit which will cause opponents to flinch, whether they’re still standing that is!

Lulu

Age: 25
Specialty: Black Mage
Secondary ability: Sensor
Ability to swim: No
Auto Abilities: Water, Fire, Thunder, Blizzard
Additional: +10 on party’s magic and +10 on party’s magic defence (when selected).

The ever so calm Lulu knows many things and like Wakka they see Yuna as a sister. Her marriage and devotion for Wakka seem to indicate that Lulu has begun to forget about Chappu and yet there is still a little bit of sincerity in some of the words she uses. Despite having a fierce nature Lulu is compassionate and during the Eternal Calm seems as though some of those thorns have gone.


knowledgeable, strong and caring are some of the words used by her friends and husband to describe Lulu. Though committed and faithful Lulu won't be rushed and if so she finds it difficault to catch up with the others. Lulu prefers to keep to herself and Wakka going at a pace where they are comfortable with. She will put her family first and would prefer it if life for them were to continue as calmly as it is. Lulu is a role model for her friends of and in particular someone Yuna and Rikku would like to envision.

Physically Lulu is the weakest character in the party and one of the slowest but her knowledge of Black Magic and spells makes up for it. Lulu can learn a wide range of spells. Although she is not the only member of the party who can learn use and learn Black Magic the effect of using Black Magic is generally greater. This makes her a capable party member when opposing fiends or opponents vulnerable to Black Magic.

Her secondary ability Sensor allows her to view the majority of opponent’s status whilst in battle. She can view an opponent’s HP, MP, any status effect inflicted and defence to elemental Black Magic. This makes Lulu handy during battle to learn opponents’ status allowing for more effective battle strategy and opposition defeating while avoiding the risk of the party being attacked.
Overdrive
Fury
Mode: Stoic = the gauge fills as Lulu loses HP though an opponents attack.
Fury multiples the effect of a spell without cost to MP. However Lulu needs to have learnt the relevant spell in order to execute a Fury. The player needs to rotate the right analogue stick as quickly as possible before the timer runs out (4 seconds). Depending how many times the analogue is rotated when the timer runs out the spell is multiplied by the number of rotations. A fury can last up to 16 spells which will be distributed randomly among the opponents however more powerful spells such as Ultima and Death will be harder to multiply.
Special Overdrive
Black Storm
Lulu will overcast the opponent(s) with a flurry of Fury. A hailing of different non elemental magic rains down on her opponent (s) 15 times. Non elemental means oblivious to any of the opponent’s(s) resistance to some types of spells fatal damage will be inflicted. Provided Lulu’s magic is substantial the opponent (s) will be fried by more then just a bolt of lightning.

Wakka

Age: 27
Specialty: Aerial attack
Secondary ability: Sparky
Ability to swim: Yes
Auto Abilities: Dark Attack, Sparky Attack
Additional: +15 on party’s accuracy and +5 on party’s luck (when selected). Sparky will physically counter attack after Wakka is attacked physically.
NOTE: Sparky will always appear by Wakka’s side in battle (except in underwater battles where Lulu will gain control temporally). (Strength is whatever Wakka’s is +5, Agility works in the same way (+5 to Wakka’s Agility)) but has no HP or MP of his own. MP cost comes out of Wakka. Sparky isn’t inflicted with damage or attacked (its Wakka that does).


After defeating Sin and the Eternal Calm overcame Spira afterwards Wakka and Lulu married and had a son. His hatred for the Al Bhed became futile after he learnt the reality of Yevon and making friends with Rikku. At times he recalls about Chappu and at times puts himself down feeling that is nothing compared to his younger brother. Certainly Beclem wasn’t supportive either but he can pull himself back onto his own feet and be of aid. Now a father he worries that Sin was nothing compared to the responsibilities of being a father.

For as long as any of his companions can remember Wakka lives the laid back trouble free lifestyle. Though he is serious about his friends, his family and BlitzBall its not immediately obvivious to everyone. Though a family man Wakka behaves like as if nothing really happened and would continue to pursuit his keen interests such as BlitzBall but not so much to give the impression that he is unaware of things happening or he doesn't care about his family. Wakka is devoted to his family but he won't put other people or things he cares about aside completely and its not surprising at the very least.

Wakka is physically stronger then Tidus and has a fair bit HP and defence that makes him ideal in endurance battles. His accuracy is second to none which makes him suitable for opposing flying fiends. He attacks using a blitzball of which he needs to perform the Wakka shot which is a variation of the Jecht shot.

Along with Vidina a family wouldn’t be complete with a faithful companion. Hence why there is a dog called Sparky who is their pet and in particular loyal to Wakka (being man’s best friend). As well as being there for the family Sparky can also take part in battles. Sparky himself is stronger physically and faster then Wakka so if a change in tactic is needed (or if Wakka’s feeling a little lazy) he can be the difference maker in any battle.

Overdrive

Wakka Shot
Mode: Comrade = the gauge fills when comrades suffer damage inflicted by opponents.
Wakka starts to attack the four times opponent whilst he performs the Jecht Shot. Strength is increased by +10. As the Blitzball spirals upwards Wakka jumps just about to smash the blitzball with his fist (rather then kicking it) when a goal like in the game blitzball appears. Wakka’s hand moves side by side (similar to the bar for Tidus’ Overdrives). A five second timer will count down and Wakka’s hand must stop where it should hit the blitzball. If done correctly the blitzball will go hit the goal and the opponent is hit for the fifth time. Strength is further increased by +10. If the blitzball is missed however or the timer runs out beforehand then Wakka fails to hit the opponent for a fifth time and no extra damage by increase of Strength.

Special Overdrive

Blitzball Frenzy
Wakka begins to hail down on his opponent (s) throwing Blitzball after Blitzball. After the 18th Blitzball has been hailed over the opponent Wakka then uses a spiked Blitzball and throws it at the opponent (s) where it will then bounce off and into the air, Wakka then leaps into the air and pounds the ball back at the opponents. Overall Wakka will hit his opponent (s) 20 times where providing there is sufficient strength behind the frenzy the opponent (s) should well and truly be balled over.

Dog Pounding
Sparky (Wakka’s pet dog) will howl to attract other dogs to opponents and together they maul and attack all opponents. In total there would be forty (40) attacks that will leave the opponents mauled, chewed on and suffering from Poison (if they are still standing afterwards!).

Sunday, 2 August 2009

Tidus

Otherwise referred to as: "Him", "You" or "You know who"
Age 20
Specialty: Warrior
Secondary ability: Copycat
Ability to swim: Yes
Auto Abilities: Cheer
Additional: +10 oparty's Defence and +5 on party's Strength (when selcted)
NOTE: Sphere changing during battle has the same affects as it does for Yuna

A Dream of the Fayth that helped set Spira free from the threat of Sin once and for all. But at the cost of this the Fayth became free from Yu Yevon's grasp. As the Fayth stopped dreaming Tidus would eventually disappear. Tidus has tender feelings for Yuna and promised that he'll always be by Yuna's side but when he disappears her heart is broken. Two (2) years afterwards they are reunited as thanks from the Fayth to Yuna for saving Spira twice. Although there were concerns everyone was glad to have him back. Nowadays he lives alongside Yuna on Besaid with Wakka, Lulu, Sparky (Wakka's dog) and Vidina. And live is peaceful and meaningful. Because he could be named differntly on FFX: his name is never said. Yuna and Rikku tend o refer to him as "Him", "You" or "You know who".

All his friends know how much of a showoff he is when its comes to BlitzBall and they all know about how much he cherishes having his friends alongside but none so much as his fondness for Yuna. Though a little bit more mature Tidus behaves the same as ever and the only time where he doesn't fight for his friends is when he and Yuna spend time together which happens a lot. He enjoys the freedom and calm wherever he goes as long as he has his friends alongside but goes into attack whenever this pleasure is threatened . He is seen along with Yuna as superheroes by their friends because of their commitment to help those who are in need. Other times however he is playful and adventurous.

Efficent against fast fiends he is the second fastest character second only to Rikku. He also has decent chances of inflicting a Critical Hit on opponements (due to his Luck Attribute) but he isn't as strong as Paine or Kimahri. Besides his ability to battle on land and underwater aswell what makes him standout is his ability to copy attacks and Magic spells from previous characters (this is done by using the Copycat command). This makes him agood all rounder in any situation.

Overdrive

Energy Rain (requires Warrior Dressphere)
Mode: Warrior = the gauge fills after Tidus inflicts damage.
After the countdown has started if the bar is stopped at in the middle (success) Tidus will attack all opponents with an increase in Strength of +10. If the bar however doesn’t stop in the middle (failure) then Tidus will attack all opponents without Strength increasing.

Blitz Ace (requires Warrior Dressphere) Tidus will attack one opponent eight (8) times; if successful Tidus will use a Blitzball to perform the ninth attack and strength increases by +10. Unsuccessful and Tidus will have only done eight attacks; Tidus would miss the Blitzball, strength is increased by +5.

Yuna or Tidus: Moogle Rampage (requires Moogle Mascot Dressphere)
(Either Yuna or Tidus (depending upon who’s overdrive is being used)) whistles out loud for support. A stampede of Moogles (some flying, some running) will blitz the battlefield and pass the opponents causing little damage each as they pass. In total fifty (50) Moogles will strike opponents flying or ground based and each Moogle (obvious to the opponents’ Defence status) will inflict 99 or more (depending upon the Strength attribute for whoever uses this overdrive) damage. Ouch! Never cross a Moogle!

Special Overdrive

The Awesome Magnificent Tidus ShotTidus becomes enraged and storms right up to the opponent (s). Tidus slices and dices his opponents 15 times and then leaps into the air like he would perform Energy Rain. In mid air he falls with his sword raining down onto the opponent(s). The special overdrive ends after Tidus performs a vertical slice from mid air though the opponent (s) resulting in the fatal 16th attack. For as long as Tidus have sufficient strength those opposing them (the party) shall be no more.

Yuna

Otherwise known as: Lady Yuna, High Summoner Yuna, Vanquisher of Sin Age 20
Specialty: Gunner
Secondary ability: Songstress
Ability to swim: Yes
Auto Abilities: Trigger Happy, Darkness Dance
Additional: +10 on party’s Magic Defence, +50 MP and SOS Guard (when selected). NOTE: Sphere changing (i.e. Gunner to Songstress) counts as a turn. While Sphere change is happening the action in battle stops and resumes when Sphere change is complete.

The High Summoner who defeated Sin; after saving Spira from Vegnagun a year ago Yuna now lives a quiet yet meaningful life on Besaid with Lulu, Wakka, Vidina (Wakka’s and Lulu’s child) and Tidus. Her role model for her less serious approach on life is Rikku and since becoming a sphere hunter for the Gullwings Yuna is much more relaxed and more confidant. And yet Yuna cannot resist helping others in need which tends to lead her friends to tease her. With her friends and Tidus back Yuna is as up beat as ever but perhaps there is a sign that she is getting tired of putting everyone else ahead of her.

Yuna feels she can help Spira continue to shine brightly even if it means repetitve tasks and going so far out of her reach to help those in need. And she isn't alone as Tidus follows her and together they are a formidable duo. Aside from the teasing and concern expressed by her friends Yuna is determined to help. When there isn't a cry for help Yuna is free to continue living live her way with Tidus. Her friends know how much she cherishes Tidus and would dread to think if they weren't together. Although at times they don't spend as much time together as they like with the plead for help simply cannot be ignored Yuna cherishes every moment together and their bond has never hindered since his return.

Beyond her astounding commitment to helping, Tidus and her friends Yuna has barely changed her more upbeat attitude. Although she doesn't see Paine or Rikku as much while they were the Gullwings nowadays their friendship hasn't deteriated as they write each other letters to keep each other posted. On the face of it people and friends will assume that nothing's changed. And though Yuna has only gotten more confident and is happier frustration does flow inside her as more and more she wants to be with Tidus and for nothing to change. She hides this from everyone including Tidus that she fears if they were to be apart. Because of this Yuna will show more aggression when her fear gets close to becomming real.

What Yuna lacks in strength is made up with her unique ability with using guns as a Gunner. No one can match her skill and sharpness when it comes down to dishing out the carnage as a Gunner. Yuna’s Trigger Happy can do considerable damage as it allows Yuna to fire repeat ably for a short while. Her speed and Luck makes Yuna ideal for inflicting critical hits that can cause an opponent to flinch.

Her secondary ability allows her to inflict negative effects on opponents and aid her allies in battle with beneficial effects. Sing abilities positively affect the party members (applying positive status effects) while Dance abilities affect opponents (applying negative status effects). However whilst in Songstress Yuna cannot attack physically and is at her weakest in Defence and Strength.

Overdrive

Double Trigger Happy (requires Gunner Dressphere)
Mode: Ally = the gauge fills every time it’s Yuna’s/Lenne’s turn.
Yuna assaults the chosen opponent with twice the allocated time (4 seconds). If however Yuna’s Overdrive gauge is full and her health have fallen to ¼ the allocated time for Trigger Happy will be increased for 10 seconds! If Yuna is attacked by an opponent or the opponent targeted is defeated it takes about a second or so to resume or change opponent.

Gunner’s Outburst (requires Gunner Dressphere) (Available only after defeating Raphas in the Gaol (chapter three (3)))

Yuna assaults all her opponents with a hail of gunfire. The entire battle freezes and attention follows Yuna as she runs towards her opponent(s). Throwing herself straight into her opponent(s) her friends will think she’s lost it when in fact she is about to fire with twists spirals and a firework’s worth of fire at the conclusion. But in order to get the most of her Overdrive the player must match the button commands when prompted on screen. In total there are four (4) button commands nesseccary to complete the Overdrive and deliver the most damage. Failure to meet any one of button commands will cause a seize fire and the Overdrive will end with much unsatisfaction and “Oh poopie!”


Misterioso Tempo (requires Songstress Dressphere)

Yuna will build herself into performance frenzy where she will sing inflicting random negative effects on her opponents. The effects on the opponents will vary depending upon the lyrics she sings. The lyrics she sings are random but if she sings the words: “Like a piano without a pianist there’s Fermata” the effect applied to opponents is Stop. Other lyrics Yuna uses will apply different effects. List of lyrics and effects applied:

“Like a piano without a pianist there’s Fermata” – Stop

“Its time to hear agagio” – Slow

“You’re moving too fast. You need to slow right down” – Slowaga

“Feel my ongoing pain!” – Poison

“I’m mad! Lets welcome madness” – Beserk

“Relax! Though you stand in stone you can still hear me” – Petrification

“Quiet please, silence is golden” – Silence

“…Because no one is as confused as you” – Confusion

“Time to say goodnight. Sweet dreams” – Sleep

“Lights out!” – KO

“Your time is up!” – Doom

“C’mon, hit me again if you can!” – Darkness

Yuna or Tidus: Moogle Rampage (requires Moogle Mascot Dressphere)
(Either Yuna or Tidus (depending upon who’s overdrive is being used)) whistles out loud for support. A stampede of Moogles (some flying, some running) will blitz the battlefield and pass the opponents causing little damage each as they pass. In total fifty (50) Moogles will strike opponents flying or ground based and each Moogle (obvious to the opponents’ Defence status) will inflict 99 or more (depending upon the Strength attribute for whoever uses this overdrive) damage. Ouch! Never cross a Moogle!

Special Overdrive

Floral Fallal
As seen in FFX-2 Floral Fallal is Yuna’s special Dressphere. The flowery costume bestows awesome magical powers. The Overdrive itself is the Great Whirl which deals magical damage twelve times. Provided Yuna’s strength is sufficient the Floral Fallal’s Great Whirl will ensure where the opponents lie, no grass will grow.